Friday, February 28, 2014

how to Fix Windows Server 2008 R2 Boot Problem

Method 1:-
  1. Put the Windows Server 2008 R2 installation disc in the disc drive, and then start the computer.
  2. Press any key when the message indicating “Press any key to boot from CD or DVD …”. Appears.
  3. Select a language, time, currency, and a keyboard or another input method. Then click next.
  4. Click Repair your computer.
  5. Click the operating system that you want to repair, and then click Next.
  6. In the System Recovery Options dialog box, click Command Prompt.
  7. Type Bootrec /RebuildBcd, and then press ENTER
Method 2:-
  1. Put the Windows Server 2008 R2 installation disc into the disc drive, and then start the computer.
  2. Press a key when the message indicating “Press any key to boot from CD or DVD …” Appears.
  3. Select a language, a time, a currency, and a keyboard or another input method, and then click next.
  4. Click Repair your computer.
  5. Click the operating system that you want to repair, and then click next.
  6. In the System Recovery Options dialog box, click Command Prompt.
  7. Type BOOTREC /FIXMBR, and then press ENTER.
  8. Type BOOTREC /FIXBOOT, and then press ENTER.
  9. Type Drive:\boot\Bootsect.exe /NT60 All, and then press ENTER.

They also note that the Drive in step 9 is the drive where the Windows Server 2008 R2 installation media is located.

How to Set up “Active Directory Certificate Service” in Windows Server 2008 R2

Active Directory Certificate Services (AD CS) is an Identity and Access Control security technology that provides customizable services for creating and managing public key certificates used in software security systems that employ public key technologies.

   or


Active Directory Certificate Services (AD CS) provides customizable services for issuing and managing public key certificates used in software security systems that employ public key technologies.

Setting up AD CS


Open the “Server Manager” and select “Active Directory Certificate   
Service” in your Domain Controller Machine


Select AD CS and Click Next 


Click Next 


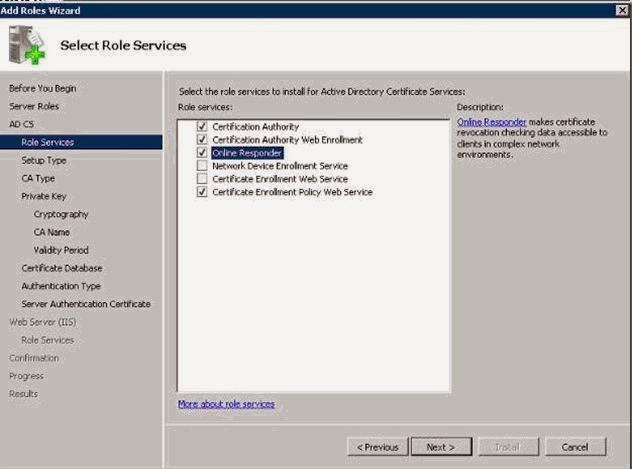
select the services and click Next


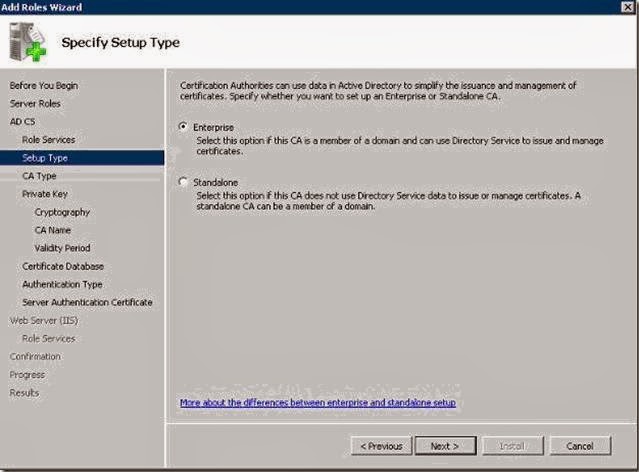
. Here I am selecting Enterprise as my setup type, click next


Select Root CA and click next.


Select “Create a new private key” and click next.


Give the names and click next (remember this will be Certificate Authority name)

Set the validity period and click next.


Configure the certificate database location and click next.


Choose a certificate for SSL encryption (use the recommended)


Click Next


After enabling web server it will automatically select the required services.


Now we are done with manual selections, just click Install and it will install the selected roles and services.


For that first we need to take the certificate from the machine which has the AD certificate Service role enabled. By default it will be located under here: (Extension of the file will be .crt)

C:\WIndows\System32\Certsrv\CertEnroll

Once you got the certificate now you can go ahead and import it in the root certification authorities folder. For that do the following.

Start –> run –> type “mmc”

It will open a console window, from the file menu select “Add/Remove Snap in”

Select the “Certificates” snap in and add it.


Once it is done then import the certificate to the “Trusted Root Certification Authorities”


If you didn’t do it then you may get the below error once you try to create a domain certificate in IIS 7.

“A certificate chain processed, but terminated in a root certificate which is not trusted by the trust provider. 0x800b0109”


How to set up DFS Replication in Windows Server 2008 R2

DFS Replication is an easy and effective way to replicate data between servers. When changes are detected in a file, only the blocks that change are replicated. Consequently, DFS Replication works efficiently over low bandwidth connections. This makes DFS Replication an excellent option for, among other uses, replicating data from remote locations to a central office. Let’s check it out.


Setting up Replication

On either the source or target server perform the following steps.

Click Start, Administrative Tools, DFS Management

In the DFS Management console, right click Replication, and select New Replication Group from the context menu to start the New Replication Group Wizard.


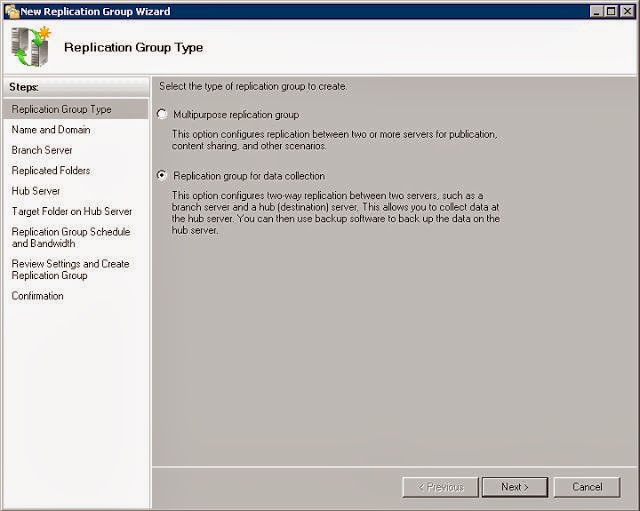
Click the Replication group for data collection radio button and click Next.


Enter a unique name for the replication group in the Name of replication group dialog box. Enter a domain in the Domain dialog box that will contain the replication group. Click the Next button.


Enter the name of the source server in the Name dialog box. All servers in a replication group must be in the same forest. Click Next.


Click the Add button to specify which folders on the source server to replicate.


Enter the path in Local path of folder to replicate or click the Browse button to browse to the folder. If you want a custom name for the replicated folder, click the Use custom name radio button and enter a new name in Use custom name dialog box. Click OK. Repeat this step for each folder


Once all the folders to be replicated have been added, click Next.


Enter the server name of the destination server in the Name dialog box and click Next.


Enter or browse to the Target folder to which the source data will be replicated and click Next.


Set the Bandwidth that will be used to continuously replicate the data or select Replicate during the specified days and times to schedule the replication. Click Next.


Review the Replication group settings and click Create to build the replication group.


After the New Replication Group Wizard completes, click Close to close the wizard.


Click the Close button to acknowledge the replication delay.


Check box Do not show this again

How to Install DFS (Distributed File System ) Replication in Windows Server 2008 R2

DFS Replication is an easy and effective way to replicate data between servers. When changes are detected in a file, only the blocks that change are replicated. Consequently, DFS Replication works efficiently over low bandwidth connections. This makes DFS Replication an excellent option for, among other uses, replicating data from remote locations to a central office. Let’s check it out.


Adding the File Services Role


This will install the DFS service and management console. This needs to be done on each replication group member.

Click, Start, right click on Computer, and select Manage.

Click Manage


Select Roles in the Console Tree and click Add Roles in the Roles Summary pane.


Click Next.


Click the check box for the File Services Role and click Next.


Click Next..


Click the check box for Distributed File System and click Next


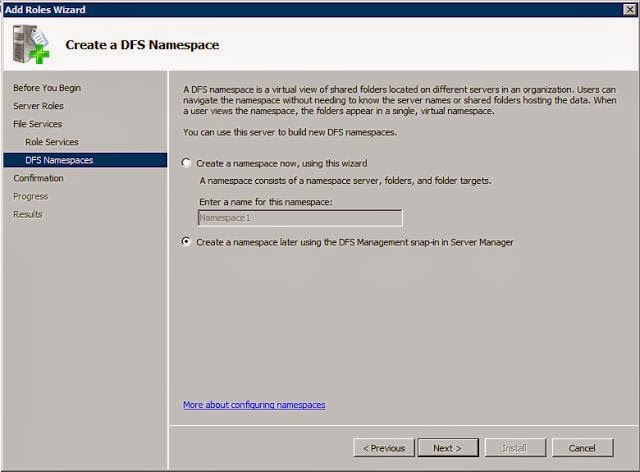
Click the Create a namespace later… radio button and click Next


Review the proposed changes and click Install


Review the installation summary and click Close to end the Add Roles Wizard.


See Next post for DFS Replication Setting
.


Friday, February 7, 2014

How to Switch from Windows Server 2012 Core to GUI Mode


First of all we should create two folders, Install and Mount. The folder Install will contain the Install.wim copied from the source DVD and folder Mount will contain the Install.wim, this folder is used for the purpose of mounting Install.wim.
Create two folders Install and Mount using mkdir command.


Change drive to where you have mounted Windows Server 2012 DVD. In my case it’s the D drive where the DVD is mounted, next step is to change your directory to Sources where the Install.wim is present.


Let's get the details about the Image that we have mounted. Use the command “dism /get-wiminfo /Wimfile:<Path of .wim file>”. In the below screenshot we can see that there are 2 editions of windows server 2012, Standard and Datacenter each with core and GUI mode. We will be using Windows Server 2012 Datacenter edition for installing the server features. Make a note of Index number which will be helpful while mounting the file.


To mount the .wim file, use the command “dism /mount-wim /wimfile:<path of .wim file> /Index:Indexnumber /mountdir:<path where you want to mount the .wim file> /readonly”.
Wait until the image file is mounted.


To install the GUI and Server Manager use the powershell command Install-WindowsFeature Server-GUI-Mgmt-Infra, Server-GUI-Shell -Source <”path to winsxs folder”>.

 If you do not specify the Source folder, the features will not be installed.


Wait until the installation is completed.


Once the features are installed, restart the computer.


To Next step Download this file Here